Tuesday, December 8, 2009

Custom Guitar Tone - Crybaby modification


I recently got a Cry Baby modification (mod) done from a company called Custom Guitar Tone. customguitartone.com

As you can see from the photo, there is a control knob on the side (Mid control) and a switcher on the base at the front of the pedal. These do not come with the pedal, they are the "mods" I had done.
I got a business card from a guy handing them out at the world record attempt, in Hamilton, for largest guitar ensemble playing Smoke on the Water. I figured the guy made a smart marketing move by targeting over a thousand guitar players in one place so I decided to look at his site, contact him and eventually send in my Wah for a mod. He modifies several pedals but I was interested in the Wah.

Direct text from his site: Wah Custom Mods Changes to component quality and values for smoother sweep and better gain control as well as improved, more vocal Wah tones. Also 100% true bypass to eliminate tone sucking and an LED indicator to indicate when the Wah is on. Add a DC Jack for external power supply on the Vox Wah. Optional mods include external volume/mid control, which adjusts the level of volume and mid-range and a 3 way bass select switch to select between 3 different bass levels. Also add an output buffer to allow for full range in to a high impedance dirt pedal. Currently, we can mod Your: Dunlop GCB95, Dunlop Hendrix JH1, Dunlop Hendrix JH1-B, Dunlop Zakk Wylde, Vox V-847, Vox V-847A, Vox V848 Clyde McCoy. (You must include 15 for the return shipping of your Wah in Canda) © 2009 Custom Guitar Tone

I ordered the Wah Vocal Mod ($25). After explaining to Doug, the owner, what I used it for he recommended a few other mods. Not to up-sell, but to compliment my desktop venture. He wasn't pushy but was sincerely interested in my uses for recording the wah. On his advice I went for the 3way Bass Switch ($30) the Mid control Knob ($30) He also offeres a True Bypass with LED ($40) and a DC jack ($30). You can get the whole package for ($95). I didn't need the LED or Bypass since I only use it when recording so it is always on. (prices in Canadian Dollars)

The photo shows you the wave file that corresponds to the audio samples. You can actually see the difference in the waves as I alter the settings. Look at the photo while you listen to the Wah Demo. (note: when
I say mid control knob "off" I mean to say "zero", when I say "on" I mean to say "10")

I used my Gibson Les Paul Studio, Bridge Pick-up, a custom setting in Garage Band for my sound TTTM (Talk to the Machine) going directly into my external audio interface. Different settings will obviously enhance or diminish the effect of the Wah regardless of any mods. I picked the settings that would best display the sounds.

Truly you need to personally play through any effects with your settings before putting down any kind of money. I took a chance on Custom Guitar Tone and I was extremely pleased all around. I hope the audio samples give you an idea as to what you will get out of your mods.

Do let me know if you get anything done.

Customer service 5/5
Sound quality 5/5
Price 4/5 (if you get the full package plus shipping it is almost as much as buying another wah so it may not be an option for you financially)

This blog post originates from:
http://nathanfleet.blogspot.com
If you read this post and only see text, follow the link for photos, audio and video samples.


Wednesday, September 16, 2009

From the Desktop to the Big Screen

This weekend LET HIM BE opens in Hamilton, my hometown. A shameless plug..I know...so let me work this into the blog.

I was hired as the arranger on this film which meant that the songs were written by another person (Writer / Director / Composer Peter McNamee) who would deliver the songs in raw form, like an mp3 recorded with one mic. Usually it would be Peter singing and strumming a guitar. From that I would figure out the tuning and chart out the chords and structure. My job was to add guitar(s), bass, programmed drums, and backing vocals. (Michael Blazer arranged all the amazing piano / clavinet)

First thing I did was load the demo track into Cubase onto a track. I would turn on the metronome within Cubase and determine the closest tempo since the scratch drums would be midi. I would then turn off the demo track and based on Peter's notes, add some basic drum beats. Then I would begin by recording rhythm guitar parts based on the charts I created when listening to the raw demos. Since the bass would be replaced with an actual bass (Performed by Gerry Gregg) I used my M-Audio Keystation and entered midi bass lines using the Virtual Instrument bass that came with Cubase. I would send these to Peter for his approval, or disapproval and go from there.

The real fun for me was writing the guitar solos which I usually saved for last. Peter was a fan of my solo work so I always added them last. The icing on the cake.

I would then send Michael the song's tempo and a stereo mix. He was working in Garage Band so he was able to send me the Garage Band project and I exported the track on my end to load into Cubase as an aif file. Now the tracks were complete and ready for Peter's vocal tracks. Peter would record his vocals, I would harmonize them, and harmonize them.

Peter's recording background goes way back and deserves it's own blog. For now, I'll just say that he is a brilliant mixer. He mixes quickly, loudly, quietly, while lying on the floor half asleep and that's it. Export the song as a stereo mix and burn it to CD. A day would go by and he'd send me brief mixing notes until he got the mix that he was happy presenting.

When it came time for removing Peter's vocals and recording Mark's (He plays Noel in the movie) I just muted Peter's vocals and created a new track for Mark which would be the versions heard in the film.

Gerry would come into the studio after listening the tracks with midi bass and put his bass mastery onto the tracks. Again, just mute the midi bass.

Since all this was done on the desktop we needed an option for going into the studio to record the live drums. I had to solo EACH track and export it. I would end up with about 12-20 individual instrument and vocal tracks , called STEMS, all the same length so that they could load into Pro-Tools (I think, I didn't attend the drum sessions) at the studio, line up all the tracks and have the drummer (John Cheesman) add the live drums.

Why did I export STEMS rather than exporting an OMF (Open Media Framework) file? Cubase SX1 doesn't offer that option which would have been much easier.

Now we had the final tracks that would be heard on the big screen. After seeing it at the AMC in Toronto I was blown away by the music even though I had spent years working on it. It was HUGE.

All the years working on the film's soundtrack from the desktop essentially cost us our time. We could work any hour of the day and communicate via the internet to achieve our goals.

I hope that you get a chance to see a screening this week (Sept 19th, 22nd, 24th) in Hamilton. I believe that this is the last North American screening before it heads overseas.

I have a personal favorite, ROCK AND ROLL. I really like the Ebow solo. I also LOVE Michael's clavinet work on I WAS THERE. You can hear that mix and more at lethimbe.com/music. These are the versions that Peter sings, not what you hear in the movie. While he often dismisses his performance as mediocre, they are beautiful and full of meaning.

It is amazing what you can achieve with a Desktop computer, an idea, some good gear, a great team and a dream

A very special thanks to Peter McNamee for his amazing songs and all the great things I learned about recording / mixing that you don't read about in a book.

This post originates from


Thursday, August 6, 2009

HINDU SCALE: Take a break from D to G and use Gm


Lesson #1
The Hindu Scale.

I have no idea what level you are at so the lessons I post will be in no particular order. I just hope to add some tools to your belt so that you have some options.

Video example at the bottom of this post using the Hindu Scale in the solo for "Song Worth Singing" that will be a track on my Talk to the Machine album.

You'll here this scale in so many genres of music. I hear it often in John William's scores which is probably why I enjoy using it.

For this exercise I am using the key of D. Those with some theory knowledge will be able to move this into any key. If you don't know theory I've created a beginner lesson near the bottom.

One of the most widely used chord progressions is D going to G. At some point you may want a change. I am suggesting that you try a G minor chord instead of G and I want to show you a great scale, Hindu, you can use with a D to Gm chord progression. I will use the guitar scale/solo as the example but you can use this for vocal lines, horn harmonies, string orchestrations etc...

The Theory
When you use a D chord going to a G chord (D being your key/tonic) the chords are in the same key (the I and the IV chord) built using the notes of the D major scale D E F# G A B C# D.

Triads: a chord with three notes
If you use a Root, 3rd, 5th starting on D you get D F# A, the notes of the D chord. If you use a R, 3rd, 5th starting on G you get G B D, the notes of a G chord. On the guitar many of these notes are doubled or tripled in a chord but they still only contain 3 note names.

Sub G for Gm
If you substitute G with G minor, certain notes will have to change.
The G minor chord contains the three notes, G Bb D. The G minor scale (the relative minor of Bb major) contains the notes G A Bb C D Eb F G

Alter the D major scale
Now if you alter your D major scale to contain a Bb and a C (from the G minor scale) your scale will look something like this D E F# G A Bb C D. This is the Hindu scale in D.

In relation to the major scale use this formula to move it into any key you want, R 2 3 4 5 b6 b7 8 or TTSTSTT (Tone, Tone, Semi-tone, Tone, Semi-tone, Tone, Tone)

Now try this scale under a D to Gm chord progression. I personally love this scale / chord combo. I may have over used it on my album but I guess that will just be considered the "style" I used.


FOR THE BEGINNER
Play this scale:
---------------------------------------------8--10-
------------------------------7--8--10--11-------
---------------------5--7--9-----------------------
--------4--5--7--8--------------------------------
--5--7---------------------------------------------
---------------------------------------------------
Over these chords:
D / / / Gm / / / D / / / Gm / / / repeat

/ = additional chord strum

What will you do with your Hindu?
Comment & post a link so we can all hear what ya did.

This post originates from

Wednesday, July 29, 2009

Writer's Block


Since 2000 I have written about 18 songs. That's it. Not due to writer's block, I just don't commit issues / topics to song if I can resolve them with a bit of thought. If something sticks in my head and I can't really work it out by thinking it through, I'll write a song about it. The songs that you will eventually hear on Talk to the Machine will be songs that are extremely important to me. Since I am an independent, no one has been waiting around for my stuff so I just let things come when they are ready.

I can't churn out a song a day because I can't and I don't want to. Don't try to be like another writer because you read that they wrote a song a day, or that they recorded 30 songs but kept 10. Let your writing style match who you are. I mostly use nature as my inspiration whereas someone else might get inspired by a gritty city. I wrote a song back in 2005, hated the lyrics so I waited...till 2009 and they finally came to me and the lyrics poured out. (The song is calledDo Not Feed the Wolves). Another song, The Vulture or the Raven, came all at once in about 5 minutes. I've learned not to force the creativity. Let it strike. That doesn't mean be lazy. I still sharpen my tools.

I've been studying music since I was 15 and my advantage is that I have been exposed to so many styles of music and that I can analyze them and figure out what is going on quite quickly, so I can usually implement several ideas quite quickly to see if something will work or not. If you get blocked musically, you may want to take some time to study a style / arrangement that you really like.


I remember in college when I first learned the chord progression Aminor--Aminor(maj7)--Aminor7th--Aminor6th (sounds like Stairway to Heaven intro, but it was a latin piece that I heard it in) I inserted it into about three songs right away.
For those interested I used it in a song called "In Silence" that is on iTunes under Nathan Fleet. I still use it. If I had not concidered studying music (read previous post Self Taught or Learned Theory - you don't have to be schooled to study) I may have never discovered the mechanics of that chord progression. I also use it on the new CD in a track called "The Devil is Coming" and in "The Staircase."

You may not have years to ponder what your song is going to be about so I recommend that you always add tools to your belt, a new chord, a new style, tempo, genre, technique, instrument, accessory etc...Then when the idea hits you have more resources to draw from.

I was trying to think of a clever way to end this post but I got writer's block.

This post originates from

Sunday, July 5, 2009

Aren't CD's dead?

I've been running a poll on my website nathanfleet.com and decided to check in on the results. I am writing a larger article on this but thought I'd touch on the matter a bit now.

I was really surprised to see that the majority of pollsters 52% buy CD's, 27% pay for their downloads and 20% are pirates.

I assume my current 122 pollsters are clinging to the old school "I like the packaging" or they think I can track the fact that they might be pirates. Yes it is a poll but I disagree with it. CD's are dying. The CD section in any music retailer is mostly a ghost town. Between Jan and June this year only 2 of my students brought CD's in to let me hear their music. MP3 players and phones currently rule. I buy on iTunes all the time. I don't need packaging anymore. I am not attached to a format anymore. In the end it is the music I love and if something comes along that removes the current delivery of it, so be it and I am in. Much, much more on this when I finish my article.

So don't YOU think CD's are dead?
This blog originates from

Wednesday, May 20, 2009

Self Taught or Learned Theory?


Rule #1 of songwriting:
If it sounds good, it is good.

That is it. Doesn't matter if it does or doesn't work in theory, or that something is in or out of tune, or that it does or doesn't follow a typical structure. If you like it, that is all that matters. Period.

"Are you schooled or self taught?" Students that are self taught are often very proud of that fact. Their parents, even more proud. Students that learn the theory of music often look back and think that their knowledge somehow molded them into being less creative by following the "rules". The real question should be "Are you creative?"

Regardless of how you learned, the fact is that you learned. We didn't invent music, songwriting, song structure, harmonies, guitars etc...so we really can't take a huge amount of credit for anything. We are simply adding our ideas to the mix.

For the most part. A self taught musician will eventually learn chords from somewhere. A schooled musician will learn that through formal education. You will both end up in the same place but you will have taken different routes.

Example; Danny Elfman is self taught. John Williams is schooled. They are both A-List composers. It is important not to look at the differences but the similarities to see how two ways of learning can land you in the same place. Most likely dedication, the love of the art, study of some kind (self or schooled).

Learning theory doesn't make you a "stale" composer. Writing stale music does that.

I am a schooled musician and I have found that learning theory can eventually speed up the creative process. I have a bunch of tools that I have at my disposal should I choose to use them but that is never what inspires the songs. An idea will pop in my head and it comes out from there. With theory I can understand how to put that idea immediately into action. Without theory it would take me a bit longer but I would eventually get there. Even non-musicians hear music in their head.

If you want to study, I think that is a great idea.
If you don't want to study, I think that is a great idea.
No one learns from nothing. You are a student of something no matter what.

So, are you creative?

This blog originates from


Tuesday, April 7, 2009

Automation - The Machine is Alive


Automation is when things operate with little or no human interaction. If you are a desktop musician, automation will be your good friend. Do you want a fade out at the end of your song? A guitar track to pan left, then right at specific points in your song? Maybe you want the distortion to gradually work it's way into your guitar track or the EQ to change on the same track, without using a new track for just a few seconds of effect. Now lets say you want ALL of these things in the same song. Let's automate. Most programs now have the line-dot way of doing things also called "Node editing." Basically, a line runs underneath the length of your track. That line represents two things

  1. An effect of your choice (volume, pan, distortion...)
  2. The adjustment for that effect (loudness, you hear sound from the left or right, more distortion - less distortion...)

By default the line is set at "+0db
" for volume, "center" for pan

FADE IN and FADE OUT.
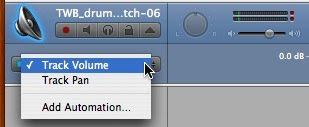
1. Select the automation arrow on the track you want to edit. It is the arrow that is next to the Lock icon on your track. It will reveal a node editing track below the audio file in the track.


Now you will see a drop down menu that will allow you to select Volume or Pan or Effect. Volume is selected by default.


2. You will notice a line that runs horizontally. On this line you will place nodes (dots) by single clicking at an IN point where you want no volume. Now select and OUT point where you want your song to be at full volume.

3. Simple "click-hold" the first node and drag it down as far as it will go. Your line will now look like it has a ramp. This represents your volume increasing or FADE IN.

4. Select an IN point where you want your of your clip or song to get quieter and an OUT point to where you want no volume. "Click-hold" and drag your OUT point down as far as it will go. Now your volume will decrease. 

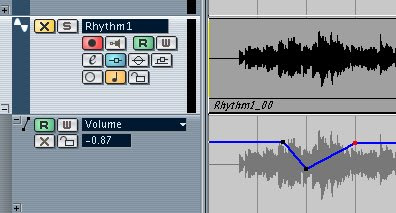
This screen grab shows the volume fading in (line going up), holding at 0db then fading out (line going down).


PAN
1. From the drop down menu at the side of your automation track select "PAN". 
By default your audio is set to Center. This is represented by a line running along the middle of your automation track.


2. Click the point where you want to start a pan and another where you want that pan to end. The click-hold to drag your node up (LEFT) or down (RIGHT)


You can have a track panning and fading in at the same time. Even if you add automation to your additional effects like distortion, EQ etc... they will all operate simultaneously, if you want them to. My friend recently told me how in the past it might take a few guys at a mixing console to operate each effect by turning individual knobs as the song was playing. Now you just need a mouse that clicks.

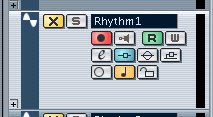
In Cubase SX1 you will need to reveal the automation track by clicking the "+" sign at the bottom left of your track.


Then select your "draw" tool


Now you can add / drag nodes to your track.

This blog originates from nathanfleet.blogspot.com

Monday, March 30, 2009

Big Guitars - Double Tracking


Double tracking guitars is the process of recording your guitar part on one track and playing the exact same part on another track. There are a few variations of this. 

Audio samples and snapshots of these techniques can be found Here  (link opens in new window) To properly hear this difference you will need Stereo speakers or headphones.

COPY / PASTE METHOD
Record your first part on track (A). Then Copy / Paste (A) on to a new track (B). Now you have the identical part on 2 tracks. You will hear a boost in volume but once you export your track, it will sound the same as a single track so you have to take it a step further. Next you want to pan them apart so you don't have 2 guitars on top of each other. Imagine a stack of coins, you can only see the top coin but you know there are more. Now if you were to spread them out in front of you, you'd see more clearly what amount you had. Same with panning your guitars. For example, if you pan (A) to the left and (B) to the right all of a sudden you will hear 2 guitars covering more "ear space." There are several degrees. "0" which is center and "-64" is far left or "+64" is far right. Before you hear this difference you have to offset your tracks.

To offset take track (B) and move it slightly along your track line. It is best to do this with magnification or zooming in on the tracks. (refer to your software manual and you will find a zoom option) Once you have zoomed in on your tracks, you can click-hold one track (B) and move it so that it is not perfectly in line with (A). This will create even more "ear space" and make your guitars sound more full, and increase the stereo effect. Let your ear be your guide. If it doesn't sound right, move it a bit more, or less.

TROUBLESHOOTING 
You may experience your track automatically jumping to a specific point, rather than the small increment you want. This is called SNAPPING. Your program will allow you to turn this on or off. In Garage Band, under the Control menu, it is simply called "Snap to Grid." In Cubase you will find a button at the top, when lit, snapping is on. (pictured below)


The benefits of Snapping is to line things up directly to a bar or beat but when you are doing slight movements. Turn it off.

PLAY IT TWICE
Randy Rhoads often played his tracks 2,3 or 4 times to get a huge guitar sound. Some love it, others...not so much. I loved his playing but I am personally not fond of the recording method. He had the talent to nail it each time. If you don't it will sound sloppy so you have to really know your part. For this method simply record track (A), then record your part again on track (B). You could offset them as above but often your playing won't be spot on so the offset may not be necessary. 

TROUBLESHOOTING
If your tracks still sound thin you may want to try:
  • Changing the sound of (B) so it sounds like 2 guitar players. Even switching pickups may do the trick.
  • Don't play the part exact. If you loosen up (B) you end up filling more "ear space." This requires a bit of pre-practice unless you are a good improv musician.
  • Try using a different guitar, if you did a track (A) with electric, use acoustic for (B). If you do this you may want to loosen up the track as mentioned above.
  • By "loosen" I mean play counter rhythms, A different, but complimenting strumming pattern.
I prefer recording 2 different parts. I find that it fills the space so much better but when you have a heavy riff that begs to be huge, double it or copy/paste/offset.

Audio samples and snapshots of these techniques can be found Here 
(Link opens in new window) To properly hear this difference you will need stereo speakers or headphones.


Saturday, March 28, 2009

Using Garage Band for Pro use.


Can you use Garage Band for pro use? YES.
Most pro's will say NO. Cool pro's will say, if you ha
ve a good song, the platform (program) isn't important. In conversation with various recording artists I hear them often say that Garage Band 
is good for demos. I say go further. All the way.

I have used Garage Band, Mac's free application that comes with your Mac, to deliver music scores for television. I must admit I waited by the phone after uploading the finished files, completely from GarageBand, thinking they'd call and say "we can't use this, when are you going to send the pro version." I never got the call. I never even got feedback. A few days later I saw the show on TV with my cues. Then I got a cheque in the mail. Can you use GarageBand for pro use? I did and I continue to do so. Not only does it sound great but it is so user friendly. 

Once I finished the recording I used the following export settings, found under GarageBand>Preferences>AdvancedI had it set for 
Auto Normalization. That basically increases the overall volume to it's maximum level, and the Audio Resolution set at Best which is the highest setting offered. At the time of these cues, I was recording directly into the 1/8" input on the back of the Mac via a Eurorack desktop mixer. On your Mac, the default input bit rate is 16. At the time I never realized that you could change the bit rate to 24.


To change the bit rate to/from 16 or 24 you have to go into your Applications>Utilities>Audio Midi Setup. Select the Audio Device tab and you will see the option to change your Input source, Format and 2
ch-16 or 2ch-24, which is your bit rate. I found a great link that explains the difference between Bit Rates and Formats. tweakheadz.com


I will say that I have already used Garage Band on portions of the album. As I get closer to the release I will explain which portions, and how I went about doing so. There will also be a blog on exporting individual tracks from GarageBand into another program like Cubase.  Till then, if you use Garage Band for pro use, don't tell them. They probably won't even know.


Friday, March 27, 2009

Outside the buck$ video example - Where Bridges Lay

In addition to my blog "Thinking outside the buck$ (part1)". I have done various music cues for cinematographer Tim Dashwood. In turn, he was testing a lens and offered to shoot a music video for me. No money was spent and the end result was a high definition video.

Thursday, March 26, 2009

Think outside the buck$ (Part 1)


When I make independent films, I work within my means. I look in my closet at the things I own and say "how can I make a film with what I own?" Take it a step further and say "who do I know that owns this?" 

Since I film and edit video, I can offer services to musicians for little or no charge and in turn they'll play on my album or lend me some gear. 

Don't be the musician asking for everything and giving nothing in return. It may work first time around but after that people will be less inclined to help you. If you are just starting out and feel that you haven't anything to really offer anyone, seek out a mentor or your school's music teacher. Most music teachers have been there, done that. 

Look up "how to" tutorials on the net. Google any topic and your bound to get several useful results. In the past, some companies offered smaller versions of their recording software as a free download. Some music stores will offer free sample CD's of trial versions. Many bands have recorded great things using much  less than what we have today. Don't be greedy, be resourceful.

Remember that tambourine your Mom bought you that you thought you'd never use. It can be a perfect addition to a track that is lacking in the percussion department. Make a shaker out of a paper bag and some rice or beans. A good friend of mine (D'arcy McGilligan) once recorded a tapped Tim Horton's coffee cup with a pencil to enhance a bass drum.

Buy the cheapest strings at the music store. Usually they are supplied by a "name" brand. You don't need a massive amp to record. You can often get by, plugging directly into your computer. (more details on this in future blogs). After each session, pinch an old T-shirt and run it along each string. It will keep your strings shiny and long lasting.

Don't have a tuner? Your North American phone's dial tone buzzes an F (3rd fret, D string or 1st Fret either E string). Record E,B,G,D,A,E onto your phone or load it onto your iPod. Play it back when you need to tune.

For a cool effect, hold any playback device, like the earpiece of your phone, against your guitar pickup. If someone is talking, it will come through distorted on your amp. 

You're independent. No one is really waiting for your release (family and friends don't count) so take your time. If you are doing something that is out of the norm or against the grain you are probably on to something cool.

There are so many things available to you where you won't spend a dime. Think outside the buck$. 

DR coated strings review


You choose the colour of your guitar so why not the colour of your strings? When I saw that DR had released coated strings I knew I had to try. Peacock Blue would look great on my black guitar. Let's be honest, the look of your guitar is important to. When I presented my new strings the reaction was unanimous. Cooool. Where did you get them? How much were they? No one asked if they were any good.

Review
You can buy them at most guitar stores. I payed about 10 US. I bought the 10 13 17 26 36 46 Electric Peacock Blue. The packaging boasts Handmade coated strings. At first I loved them. Very smooth, no drag on your fingers and they looked cool. After a few days of solid playing, the coating starts to wear off and that is where I lost interest. As you play, it feels like little bits of grit or dirt and you can see the steel string where the coating wore off. They look cool, feel great at first, a bit pricey and the wear happens quite quickly. 

If I was endorsed or had the money to change my strings every session or gig I may consider switching from my regular GHS Boomers Custom Lites. Till then, I'll look a little less cool.

**1/2 out of *****


Tie a String around your finger...or leave the pack in your case.


I am using a few guitars to record. A Hollow body wants different strings than a Gibson electric. An acoustic needs something different than the classical. One song calls for drop tunings, lowering the pitch of a standard tuned guitar, and another calls for up tuning, raising the pitch. A jazzy songs wants heavier strings while the rock song wants something thin or light. Nylon, Bronze, Nickel and the list goes on.

Problem. Recording is a busy job for the desktop musician. We take on several roles so we have to be organized. I have gone through several packs of strings for various reasons and often forget what is currently on the guitar. 

Solution. When you change strings, leave the empty pack in your guitar case. When you change them, recycle the old package and place the new package in your case. If you loved the strings that currently have on, the only way to get em' back is to know the gauge and brand. You could even do a string review in your blog after you've jammed them for a while. Choosing what strings you use is a whole other blog.